
How to Install Perforated Pipes

Are you dealing with water damage or persistent drainage problems around your property?
Installing perforated pipes might be the perfect drainage solution you've been looking for.
This guide will walk you through the process of installing perforated drainage pipes, helping you create an effective water drainage system to protect your home and landscape.
Planning Your Drainage Solution
Before you start digging, it's crucial to plan your drainage system carefully:
- Assess your property's drainage problems and identify areas prone to water accumulation.
- Create a site map, marking the locations for your perforated pipes and noting any utility lines to avoid.
- Determine the best route for your drainage system, ensuring it leads water away from your home and towards an appropriate outlet
- Consider the frost line in your area to determine the proper depth for your pipes.
- Materials and Tools Needed
To install perforated pipes, you'll need:
- Perforated Land Drainage Pipe (consider twinwall drainage pipes for added strength)
- Gravel or pea shingle for backfill
- Landscape fabric or membrane
- Tape measure and line level
- Shovel and garden rake
- Filter fabric
- PVC pipe for connections (if necessary)
Step-by-Step Installation Process
Step 1: Layout and Excavation
- Mark the path of your drainage trench using stakes and string.
- Identify the lowest point of your drainage area, which will be the starting point of your trench.
- Dig the trench, maintaining a slight slope (about 1 inch per 10 feet) away from your property. The trench should be wide enough to accommodate the pipe and surrounding gravel.
Step 2: Preparing the Trench
- Line the bottom of the trench with a layer of gravel, about 2-3 inches deep.
- Place landscape fabric or geotextile membrane over the gravel to prevent soil from mixing with the drainage material.
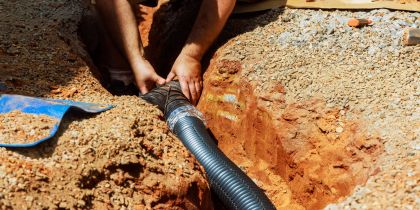
Step 3: Installing the Perforated Pipe
- Lay the perforated drainage pipe in the trench, ensuring the perforations are facing down for optimal water collection.
- Connect pipe sections securely, using appropriate fittings or couplings.
- Use a line level to check that the pipe maintains the proper slope throughout its length.
Step 4: Adding Gravel and Backfill
- Surround the pipe with a layer of gravel, covering it by at least 2-3 inches.
- Wrap the gravel and pipe with filter fabric to prevent soil from entering the system.
- Backfill the trench with soil, tamping it down to prevent settling.
Step 5: Finishing Touches
- Replace the topsoil and restore any disturbed landscaping.
- Create a slight mound over the trench to account for natural settling.
- Test your drainage system by running water through it to ensure proper flow.
- Special Considerations
Foundation Drainage
When installing perforated pipes around foundations, take extra care to maintain a proper slope away from the building. Ensure the pipe is placed below the level of the foundation footer to effectively collect and divert water.
Tree Roots and Obstacles
Be mindful of existing tree roots and other underground obstacles. While it's best to avoid them when possible, you may need to carefully work around them or consider alternative routing for your drainage system.
Integrating with Existing Systems
If you're adding to an existing drainage network, ensure your new perforated pipes connect seamlessly with the current system. This may involve using adapters or transitioning to solid PVC pipe at connection points.
Maintenance and Troubleshooting
To keep your perforated pipe system functioning optimally:
- Regularly inspect your drainage outlets for blockages or damage.
- Clean out any accumulated debris from catch basins or drain openings.
- Monitor the ground area for signs of poor drainage, such as standing water or soggy areas.
If you notice persistent drainage issues despite your installed system, you may need to:
- Check for clogs or damage to the pipes.
- Verify that the slope is still adequate and hasn't been compromised by settling.
- Consider adding additional drainage lines to problem areas.
Wrapping Things Up
Installing perforated pipes is an effective way to address drainage problems and protect your property from water damage.
By following this guide, you can create a robust drainage solution that will keep your landscape dry and your foundation secure.
Remember, while many homeowners can successfully install perforated pipes as a DIY project, don't hesitate to consult with a professional for complex situations or if you encounter any difficulties during the installation process.
With proper planning, careful installation, and regular maintenance, your perforated pipe drainage system will provide years of reliable service, ensuring your property remains free from excess water and the problems it can cause.

